New Switch Panel

May 14, 2018

“So, what else have you guys been up to?” we’re asked.

This…

Our new Blue Sea power distribution panel.
New Switch Panel: A work in progress. Another candid shot by sneaky Cyndi!

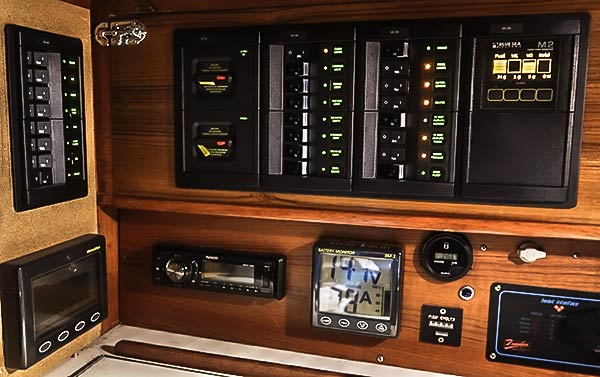
We ordered a new, custom switch panel from Blue Sea Systems. It’s a pretty neat deal. You design your custom panel online with their web interface. When you’re done, you get a pretty picture of what it’ll look like. Here’s ours…

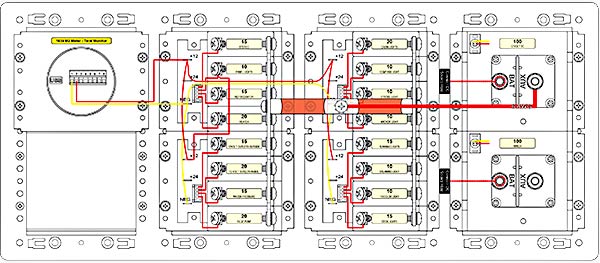
After we placed our order, we got this proposed wiring diagram…

Proposed wiring of our new custom switch panel.

The panel, including the OLED, four tank gauge and four ultrasonic senders, was about $1500 US. Go2Marine gave us a very good price!

I think the tank gauges were a mistake. I have always loved Blue Sea products, but in my opinion, they messed up with this product. It’s not very accurate and the calibration modes don’t work well, or not at all in some cases. After we got the senders installed in the tank (big job), and we called their tech support to ask why the readings were so bad and they informed us that for small tanks, we needed to drill holes in the senders. To do that, we’d have to remove them from the tanks, drill, and reinstall! Thanks! You could have put that in the instructions!

We finally have them set up pretty well. I think this gauge will be better than the Tank Tender we’ve used for 15 plus years. (Tank Tender: When it was calibrated, it worked really well, but keeping it calibrated was difficult. If the gauge was ever over-pressured, it would change the calibration, or worse, break the gauge. Calibration was HARD.)

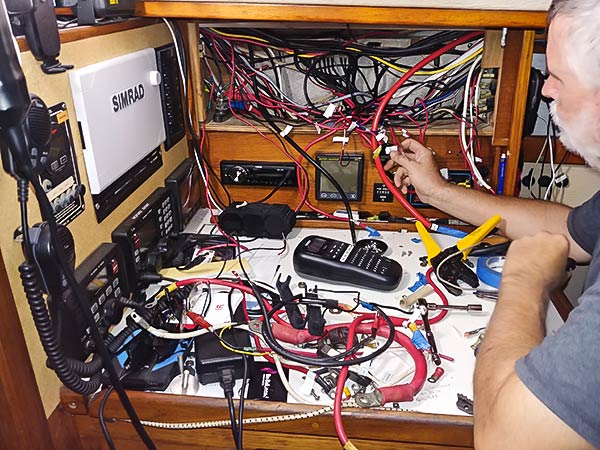
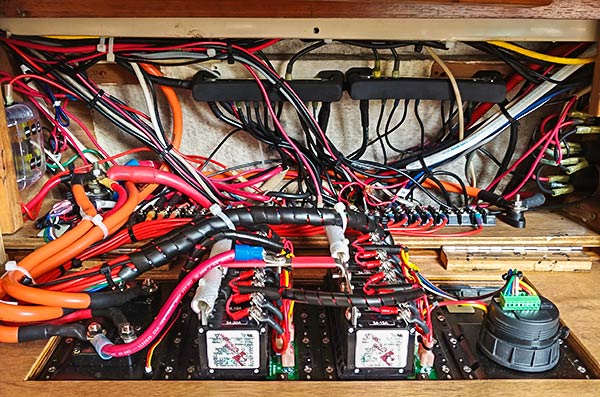
Putting this new panel in was a huge job – basically rewiring a lot of Legacy. But it was so worth the effort. Our old panel was a mess with wires running chaotically and so tight that opening the old panel for trouble shooting often pulled wires off the backs of switches. Only about half the switches were still working.

The new wiring isn’t perfect but it’s so much better, and we can now open the panel without ripping wires off the switches (not that we should need to open this often).

What I learned, or what I should have done differently…

I connected the Blue Sea M2 Tank Monitor to the Panel Lights breaker. When the lights are on, the gauge is on. I should have put it on its own breaker, or maybe a momentary switch.

It might have been better to connect both the tank monitor and panel lights to a momentary, push-button switch. Neither really needs to be left on.

I would not buy the Blue Sea M2 Tank Monitor again. It just isn’t a very good unit. I would not recommend it to anyone.

I might have figured out a better way to run the really big power cables to the panel (12 volt master and cockpit electric winch). They’re not bad the way I have them, but they could be better. I used welding cable which is more flexible with it’s hundreds of small wire strands. That helps. The issue is that these cables need to flex when opening and closing the switch panel door, without pulling excessively, rubbing on other stuff, or getting caught in the door. It’s best to run them so that they twist instead of bend when the door is moved.

Haul Out, 2018

May 9, 2018

We usually haul the boat out of the water for new bottom paint and related maintenance every year, but we made it two years this time. The reason that we could wait an extra year was the extraordinary Hemple NCT 8190M bottom paint we’d used back in 2016.

OK, I know that the bottom in the pictures below doesn’t look so good, but there’s only fouling in the areas where the bottom paint wore away – around the waterline and on the leading and trailing edges. The paint is made to wear away as the boat is used but we probably didn’t put enough paint on those areas last time. In the last picture in the set below, you can see exactly where the paint wore off. Where the paint didn’t wear away, it was working well, even in Tauranga where the fouling is foul (sorry).

We had a few other major tasks while the boat was out of the water. We’d bent our shaft strut in Tasmania and while we did our best to straighten it, it needed more work. To do that, we had to take the prop shaft out and to do that, we had to drop the rudder. When we did that, we got a big surprise.

We found a pretty big crack in the rudder, hidden in an area where it wouldn’t have been visible even when diving on our bottom. We drilled a few test  holes and the surrounding area was clean and dry. What a relief. The amazing Bridge Marina Travelift crew ground the rudder down and added new layers of fiberglass over the cracked area.

I think that most of the stress is handled by a stainless steel web welded to the rudder shaft inside the rudder. If that’s the case, this repair should last a long time. I think the cause was just poor manufacturing. The glass was very thin in the spot that cracked and most of the thickness there was foam used for shaping. Below the crack, on one of the top surfaces of the rudder, you could see the seam where the two halves of the rudder were joined when it was made (visible thanks to a little wear on that surface).

I was worried that this repair would mean a huge delay getting back in the water, but thanks to Merrick at the yard, we launched right on schedule, even with the crack repair.

There were a few out-of-the-water projects that slipped through the cracks. 😉 One of them is apparent below – we didn’t get a chance to clean and wax the topsides. Oh well. We’ll do it in Fiji!

A nice, slippery new surface on Legacy’s bottom.

I can’t say enough about the yard here at the Tauranga Bridge Marina. This is the forth time we’ve used this yard and they are amazing. The price is reasonable and the service is perfect. The staff are professional, accommodating and very knowledgeable.

Update: Wow, just thinking about all that work makes me tired…

Sneaky Cyndi took this sometime during or right after our haul out. I didn’t even have the strength to take off my glasses.

-Rich

Keyboard Cover

May 2, 2018

Keyboard Condoms save lives!

Our friends on Bright Angel are sailing from New Zealand to Tahiti – a long, tough passage. Today’s report on YIT says that they lost their computer to water damage (they have a backup, fortunately). I thought that was a good-enough reason to repeat this post about keyboard covers.

I don’t like the feel of our keyboard with a cover, but it has saved our computer several times. It’s over six years old and going strong (that’s 93 in computer-on-a-boat years!).

Prevent STDs (Saltwater Trashed Devices). Use keyboard protection!

-Rich

New Liferaft for Legacy

April 19, 2018

Our old liferaft celebrated it’s 26th birthday a while back and that’s just too old. Usually, they can’t be repacked after they get to be about twenty, and they are supposed to be repacked every year. Well, we didn’t quite do that. We had it done before we left six years ago and not since. Time for a new liferaft!

So what does one do with the old liferaft? Try it! That’s what we did, and while it worked, there was a surprise.

Trying out our old liferaft with some help from Pam and Leo (and Tuli taking pictures). They’re from the yacht Kosmo, just down the dock from us.

The first surprise was that the line was HARD, HARD, HARD to pull. The theory is that you toss the raft overboard in an emergency (not an easy task since it weighs about the same as the moon), and then pull the line that attaches it to the boat until the line activates the inflation mechanism.

So I pulled…

Trying to pull the stuck line from the liferaft canister.

But the line didn’t budge. I pulled harder. It gave a little and then got stuck again. I pulled hard again. It gave a little more. This battle continued for quite some time. I was shocked at how long the line was…

The long, very hard to pull line on our old liferaft.

I really don’t know that we would have been able to inflate the raft in a true emergency. I had the advantage of the friction of the grass. If I’d pulled that hard with the canister in the water, it would have just skipped across the waves. I guess we’d have managed but the language involved wouldn’t have been pretty.

Finally, BOOM…

Our old raft finally inflating.

The next surprise was just how small our supposed six person raft was. Here it is with just 3.6 people in it and it was pretty packed. (I was reading the directions, trying to figure out where the guest bedroom was.)

Our 6 person raft packed with just four of us in it.

Our new raft is only a four person version instead of our old six person raft. I hope Cyndi doesn’t mind extreme closeness! Wait, I hope we never have occasion to find out just how crowed it is.

It wasn’t all yanking lines and struggling. It was kind of fun and a great learning experience.

I hope Leo has this same great attitude if it’s ever for real!

-Rich

Space Heater Thermostat

April 10, 2018

There are some simple, basic things that are part of normal life and mostly taken for granted that are either luxuries or non-existent when cruising. The basic thermostat most people have hanging on a hallway wall is one of those things.

Here in New Zealand, we use a little space heater to keep warm while at a dock with shore power. This is our newest one…

While it has a built-in thermostat, it’s not very effective – it probably can’t be since it’s measuring the temperature right on top of the heater. It turns on when it’s too cold in the boat and doesn’t turn off until it’s too hot. “Ah! I can do better” I said to myself.

Enter the Space Heater Remote Control. Yes, I had a dream: A thermostat that would sit by our bed, measure the temperature there, where it matters, and turn the space heater on or off. After not being able to find one online, I decided to build my own. (It was a great excuse to avoid some real boat work for a couple of days!)

I did find what here in New Zealand is called a “Remote Controlled 3 Outlet Mains Controller,” pictured below. How hard could it be to hack one of these and use an Arduino as a thermostat?

Remote Controlled Mains Outlets from Jaycar (here)

For those who don’t know, and Arduino is a little, single-board computer that’s great for DIY stuff. This is what one looks like…

I added a small, readily available LCD to the Arduino and a temperature sensor and the project was heating up (sorry). Below is the temperature sensor I used.

Thermistor Temperature Sensor from Jaycar (here)

The software to run the Arduino went the way it usually does for me, in that my original, very simple concept got more and more complicated as I went. It would be nice to be one of those people who plan the project out from start to finish before they start writing code but that isn’t me. I dive in and just swim through the ever-increasing waves of complexity that come at me. I generate most of those waves myself. For example: This thermostat should save the last setting when it’s powered down, right? That involves storing values in static memory but if you keep writing the same memory cell over and over, they wear out, so you need to add wear-leveling so you don’t use up the available one million cycles (which would have lasted about 37,000 years, but it’s the principle of the thing, right?). But despite the maybe unnecessary complexities, it’s done and if you want it, here it is below.

Arduino sketch: sh_therm_1-3.
Feel free to use it any way you’d like.
Fritzing diagram of the wiring:  sh thermostat 1
(and a jpg if you don’t have Fritzing installed).

Next up: hacking the remote control to work with the Arduino. I got lucky on that front and it turned out to be very simple. There was an “All On” button and an “All Off” button (since this remote can control three outlets). I decided to use those buttons. I quick look on my oscilloscope showed that the shared contracts for those buttons was at ground or open. The other contacts were open or at 3 volts. I tried shorting those button contacts through a 1K resistor and it worked! That meant that I could connect an Arduino digital output pin to those buttons via a 1K resistor and control the remote control from the Arduino by pulsing a digital pin low for a short time (I chose 50ms kind of at random and it works).

The Mains Controller remote ran from two batteries (about 3 volts). I powering the Arduino from its built-in USB port and it has an on-board regulator with a 3.3 volt output. Close enough for powering the remote.

Here’s a picture of the hacked remote control board…

Modified remote control board with the two added 1K resistors. The tape is just to protect the wires during assembly.

Cyndi described my work on this project yesterday as “frantic.” I guess it was. The weather maps showed a big cold front moving our way bringing cold air from Antarctica. I wanted to get this done before it hit.

And I mostly got it done, all except getting it stuffed into a project box. Last night, we ran it with the bare circuit boards sitting on a shelf. IT WAS GREAT! After a minor code update to turn the hysteresis down to 1°F, the boat stayed comfortable all night long and without the heater cycling on and off too often. I couldn’t be happier!

Here’s what my thermostat looks like now…

Finished Remote Space Heater Thermostat

And here’s what my jacket looks like on the floor…

…because I no longer need to keep putting it on and taking it off when inside our boat! 😉

Update:

I made a mistake. I should have used channel A, B, C or D on the remote instead of all-on and all-off. If you take the power away from the plug unit on the AC mains, it loses it’s memory and needs to be reprogrammed by pushing the A, B, C or D buttons on the remote. All-on or all-off won’t do it. If I’d used one of those channels, then after reconnecting power to the mains unit, I could have just turned the thermostat on or off to do the programming. Does that make sense?

-Rich